
Google マップを表示するのに便利なプラグインはいくつもありますが、有名なプラグイン「Advanced Custom Field」(アドバンスド カスタム フィールド:以降ACF)を利用すれば、使いやすい編集画面と地図(Google マップ)表示ができるようになります。
もくじ
Advanced Custom Field で フィールドグループを設定する
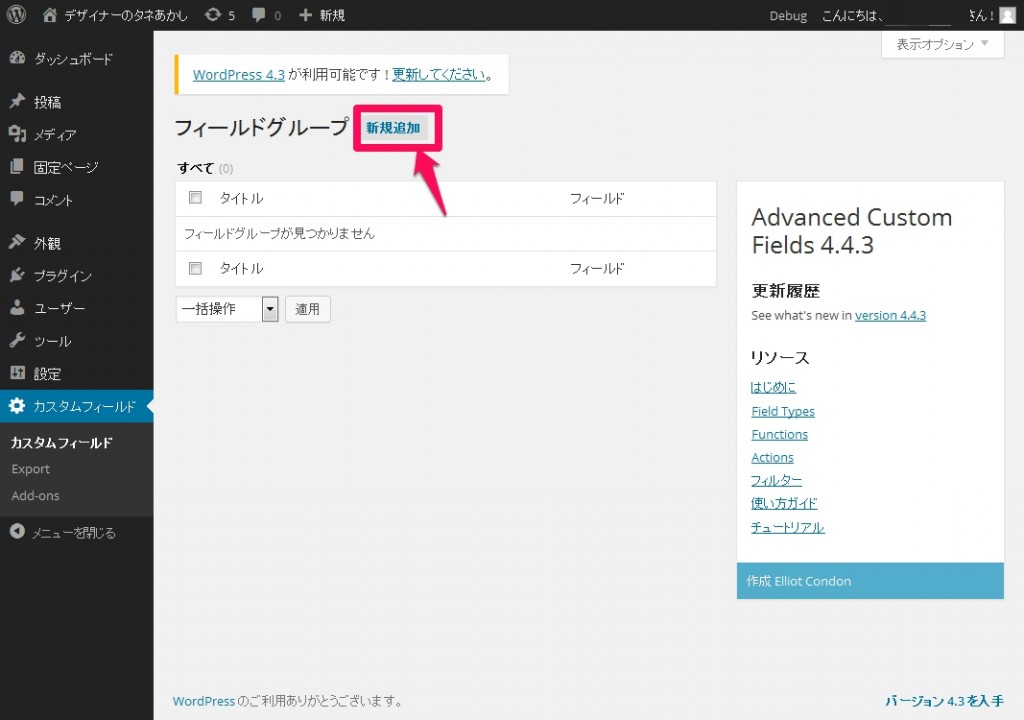
AFCをインストールすると、管理画面の左メニューに「カスタムフィールド」というメニューが追加されます。
「カスタムフィールド」をクリックして設定画面を開き、フィールドグループの「新規追加」をクリックします。
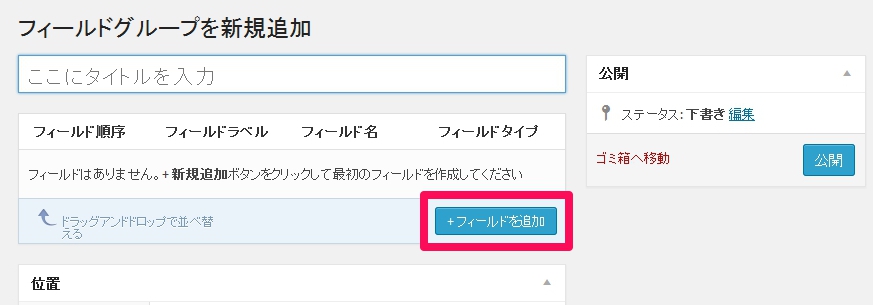
新規追加画面が表示されますので、一番上のフォームに「フィールドグループ名」を入力してください。
続いて「フィールドを追加」をクリックします。
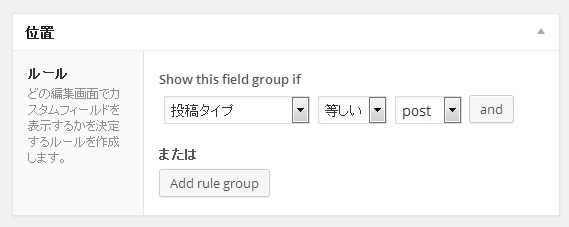
「位置」ではこのフィールドグループを表示させたい場所を設定してください。
投稿タイプや個別ページ、カテゴリー、特定のページのみなど詳細にルールを設定することができます。
「オプション」はお好みで設定してください。

「フィールドを追加」で表示された項目を埋めていきます。
「フィールドラベル」「フィールド入力のヒント」は編集画面に表示される見出しと説明文になりますので、わかりやすい名称と文章にしてください。
入力例はこんな感じになります。
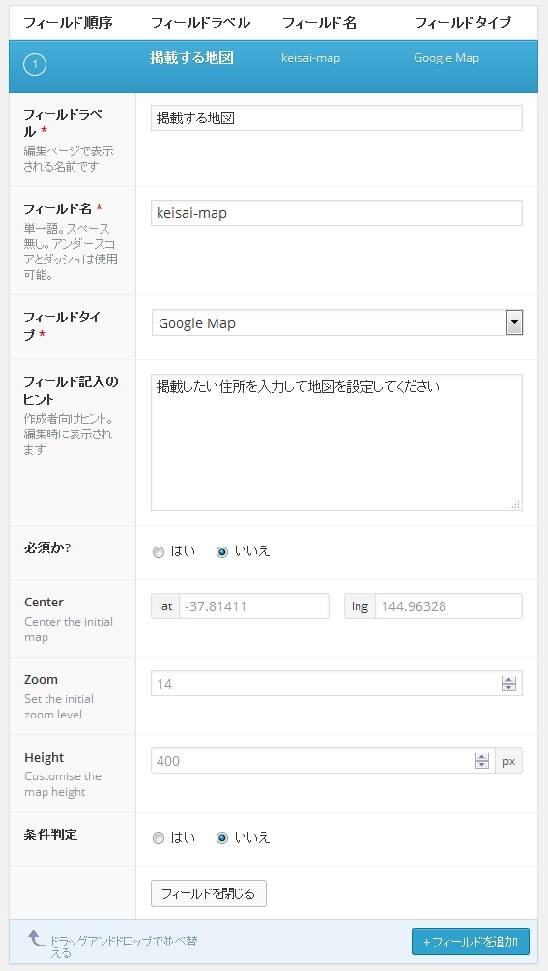
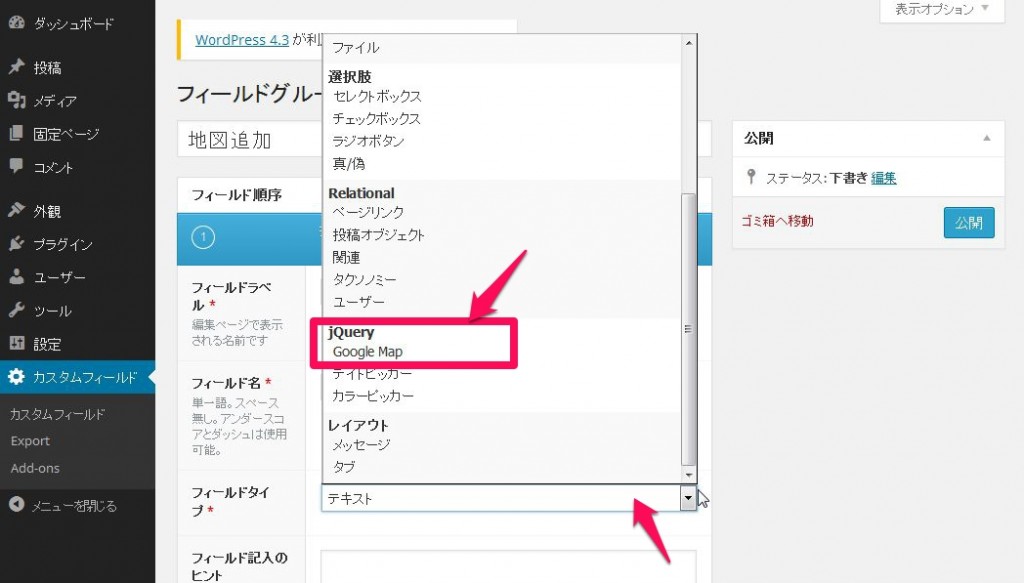
「フィールドタイプ」をクリックすると「Google Map」がありますので選択します。
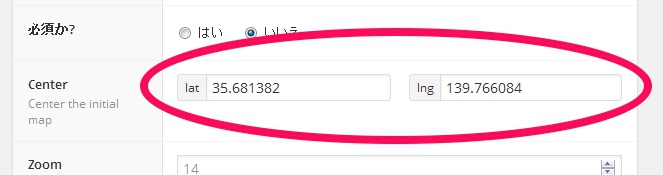
「Center」項目には緯度(Lat)・経度(Lng)を入力します。
編集画面に表示される地図のデフォルトの位置になります。
何も指定しないと海外になっているで、よく入力するであろう地域を指定しておくといいのではないでしょうか。
地図のデフォルト表示「Center」の設定例
「Center」に何も設定しないでおくと、編集画面で最初に表示されている場所が海外になってしまいます。
そこで緯度・経度情報をGoogle マップから取得して日本のどこかにしておこうと思います。
※このサイトを使うと簡単に緯度・経度を取得できます。
緯度経度をGoogleMapで確認
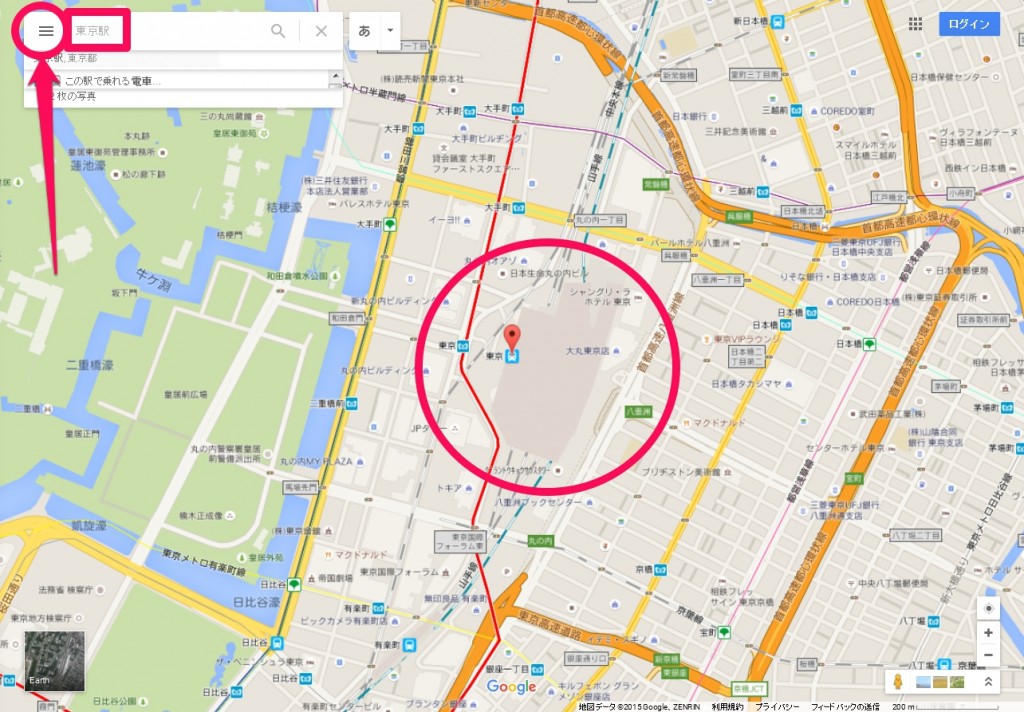
今回は【東京駅】をデフォルトの「Center」に設定する手順を説明します。
まずは、Google マップで【東京駅】を検索して表示します。
そして画面左上のハンバーガーメニューをクリックします。
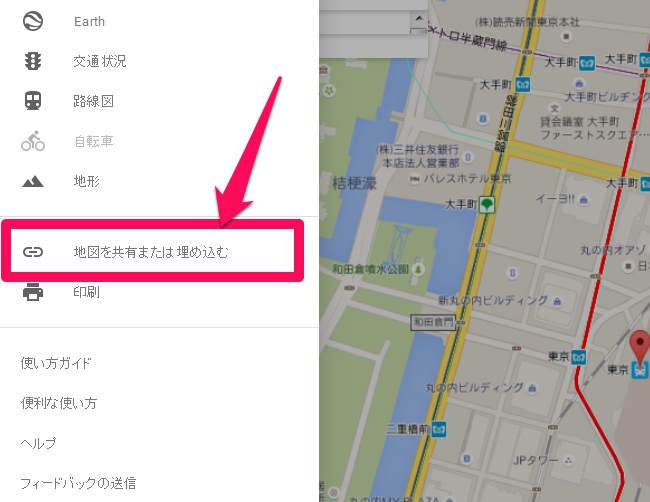
メニューから「地図を共有または埋め込む」をクリックします。
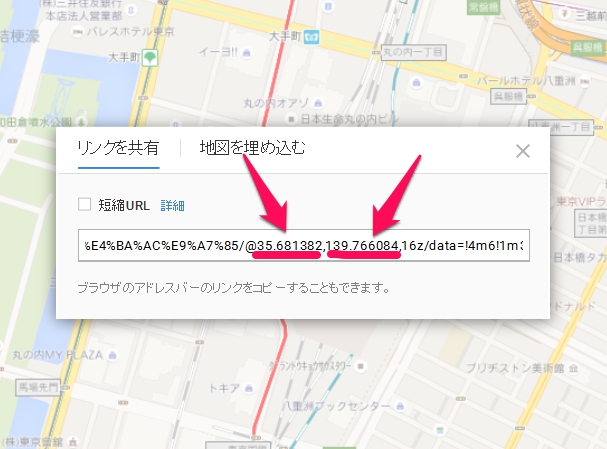
するとポップアップが表示されます。そのURLを確認してください。
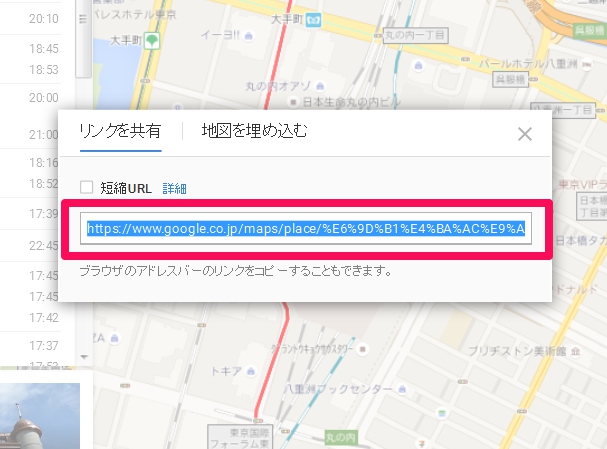
@から始まる数値があります。これが【東京駅】の緯度・経度になります。
カンマで句切られた数値が左から緯度(Lat)35.681382、経度(Lng)139.766084 になりますので、これをAFCの設定画面「Center」の各入力フォームへコピペします。
このように数値を設定できたら、デフォルトが東京駅になりました。
投稿編集画面の表示
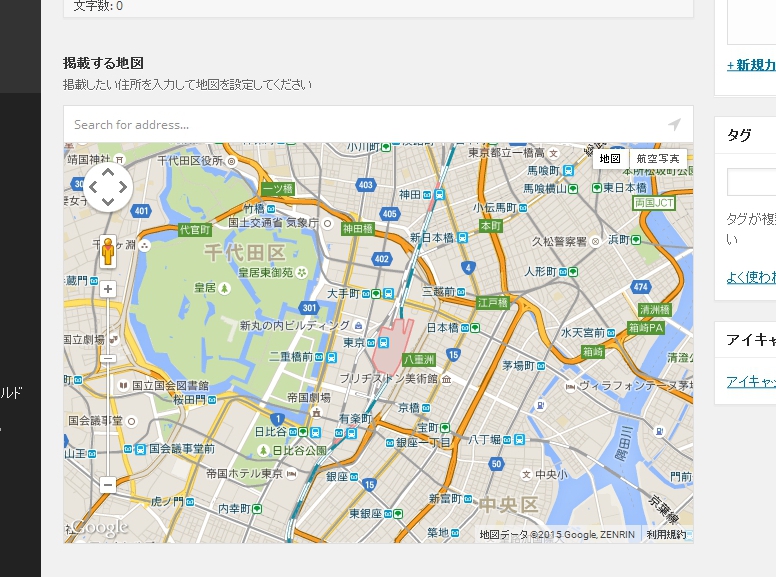
ACFの設定が終わったら投稿の編集画面を確認してみてください。次の画面のようにGoogle マップを利用した地図編集ができるようになっています。
「フィールドラベル」と「フィールド記入のヒント」はこのように表示されますので、編集者がわかりやすいようコメントをいれておきましょう。「Center」で設定した地図がデフォルト表示になっています。
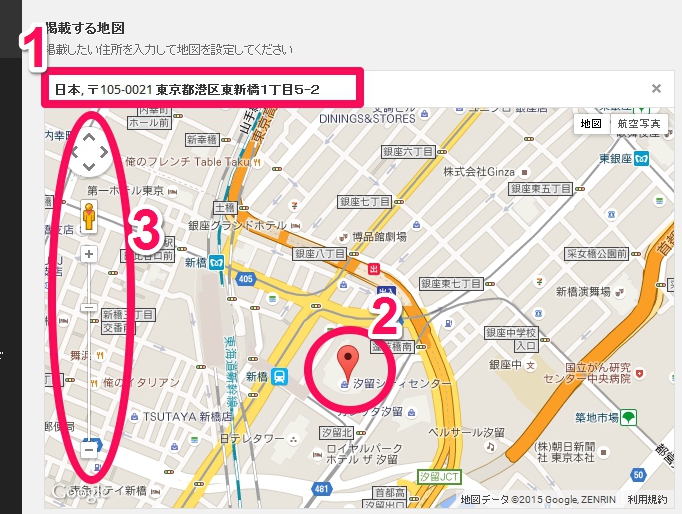
地図の設定方法は次のとおりです。
- 赤枠部分へのテキスト入力
- 通常のgoogleマップ同様に地図上で目的地をクリック
- 拡大・縮小の設定
とても簡単に地図情報を設定することが可能になりました。
Google マップの出力(表示)方法
ACFの公式サイトで紹介されているソースをそのまま利用すれば、簡単に表示させることができます。
javascript(jQuery)とCSSの用意
公式サイトのソースを転記します。
CSSは適宜変更してご活用ください。
<style type="text/css">
 .acf-map {
           width: 100%;
           height: 400px;
           border: #ccc solid 1px;
           margin: 20px 0;
          }
</style>
※CSSのクラス名(.acf-map)を変更する場合は、上記の黄色テキスト部分も併せて変更してください。
Google APIを利用しています。
<script src="https://maps.googleapis.com/maps/api/js?v=3.exp&sensor=false"></script>
下記のソースコードは外部ファイル化して読み込むといいでしょう。
<script type="text/javascript">
(function($) {

/*
*  render_map
*
*  This function will render a Google Map onto the selected jQuery element
*
*  @type	function
*  @date	8/11/2013
*  @since	4.3.0
*
*  @param	$el (jQuery element)
*  @return	n/a
*/

function render_map( $el ) {

	// var
	var $markers = $el.find('.marker');

	// vars
	var args = {
		zoom		: 16,
		center		: new google.maps.LatLng(0, 0),
		mapTypeId	: google.maps.MapTypeId.ROADMAP
	};

	// create map
	var map = new google.maps.Map( $el[0], args);

	// add a markers reference
	map.markers = [];

	// add markers
	$markers.each(function(){

    	add_marker( $(this), map );

	});

	// center map
	center_map( map );

}

/*
*  add_marker
*
*  This function will add a marker to the selected Google Map
*
*  @type	function
*  @date	8/11/2013
*  @since	4.3.0
*
*  @param	$marker (jQuery element)
*  @param	map (Google Map object)
*  @return	n/a
*/

function add_marker( $marker, map ) {

	// var
	var latlng = new google.maps.LatLng( $marker.attr('data-lat'), $marker.attr('data-lng') );

	// create marker
	var marker = new google.maps.Marker({
		position	: latlng,
		map			: map
	});

	// add to array
	map.markers.push( marker );

	// if marker contains HTML, add it to an infoWindow
	if( $marker.html() )
	{
		// create info window
		var infowindow = new google.maps.InfoWindow({
			content		: $marker.html()
		});

		// show info window when marker is clicked
		google.maps.event.addListener(marker, 'click', function() {

			infowindow.open( map, marker );

		});
	}

}

/*
*  center_map
*
*  This function will center the map, showing all markers attached to this map
*
*  @type	function
*  @date	8/11/2013
*  @since	4.3.0
*
*  @param	map (Google Map object)
*  @return	n/a
*/

function center_map( map ) {

	// vars
	var bounds = new google.maps.LatLngBounds();

	// loop through all markers and create bounds
	$.each( map.markers, function( i, marker ){

		var latlng = new google.maps.LatLng( marker.position.lat(), marker.position.lng() );

		bounds.extend( latlng );

	});

	// only 1 marker?
	if( map.markers.length == 1 )
	{
		// set center of map
	    map.setCenter( bounds.getCenter() );
	    map.setZoom( 16 );
	}
	else
	{
		// fit to bounds
		map.fitBounds( bounds );
	}

}

/*
*  document ready
*
*  This function will render each map when the document is ready (page has loaded)
*
*  @type	function
*  @date	8/11/2013
*  @since	5.0.0
*
*  @param	n/a
*  @return	n/a
*/

$(document).ready(function(){

	$('.acf-map').each(function(){

		render_map( $(this) );

	});

});

})(jQuery);
</script>
※CSSのクラス名(.acf-map)を変更する場合は、上記の黄色テキスト部分も併せて変更してください。
出力用のPHP
地図を表示したい場所に下記のソースコードを設置してください。
黄色のテキストをACFで設定した「フィールド名」にしてください。CSSは適宜変更して大丈夫です。
<?php

$location = get_field('keisai-map');

if( !empty($location) ):
?>
<div class="acf-map">
	<div class="marker" data-lat="<?php echo $location['lat']; ?>" data-lng="<?php echo $location['lng']; ?>"></div>
</div>
<?php endif; ?>
※CSSのクラス名(.acf-map)を変更する場合は、上記の黄色テキスト部分も併せて変更してください。
以上で、Google マップの設置が完了になります。